

I love to find thrifted clothes. It gives me a lot of pleasure to find something used instead of buying new. A lot of waste nowadays comes from fast fashion and the only people it benefits are the owners of large companies.
So, how can someone help and not give money to the mass-manufacturing machine?
Find secondhand clothes!
One of the things I love to look for is denim. It can be so expensive to buy new jeans or new overalls. It makes my wallet cry… But I’ve found a lot of great jeans and overalls second-hand that have been super affordable (less than $15!) and they have also been in great shape.
Another upside to buying second-hand clothes at such awesome prices is that it’s not so scary to do crazy stuff with them! It gives you the freedom to play and explore without worrying you are ruining a $100+ pair of jeans.
So now, follow along with me as I take two pairs of secondhand, distressed jeans and add my own flair to them!


I’m actually not a big fan of distressed jeans. The holes look shabby, messy, and kind of boring. At least to me. I also don’t like the idea of not having fabric covering my knees in case I fall or come across any other hazards. I’m a clutz. I know it. lol
I do however really like the look of patches on jeans. Specifically, the kind that is applied to the inside of the pants so you can still see the shape of the hole. They can be made to look like little windows for printed fabrics to peak out of.
These are the kinds of patches I’m going to be demonstrating today.
For some background,
These jeans were full-length, distressed, stretch denim from Torrid.
First up, Patching the holes.
Some of the holes actually had patches of denim behind the white threads. I took these off so I could add my own fabric, but kept them in case I could use them to patch other things later.
(I actually used one to patch a hole in the crotch of my jean short overalls. You can find that project here!)
When I first started this project, I wasn’t sure how to deal with the fact that the denim was stretchy. So I put on the jeans and took general measurements of how big the holes were when they were on my body. While this was interesting and gave me a rough idea of how much scrap fabric I’d need, it didn’t end up being very accurate in the end.


While this worked ok, it didn’t work great.
I found that the denim would stretch much more than it was when I was wearing them and being still. After seeing how much the jeans could stretch I was worried about how much they might need to stretch at any given time.


The way I found that worked best for me, was to stretch the denim as much as I could over a square embroidery frame and then measure the size of the hole at maximum stretch. I figured this would make it so that the patches would be most likely to handle the stretch of the denim and not make the jeans tighter.
This worked really well for me and I haven’t had any problems with my patches hindering the stretch of my jeans.

You want your patches to have plenty of extra room. I would do at an absolute minimum, an extra inch of overlap. But two inches or more would be good if you are able.
Some of that extra fabric will be used not only to hinder extra fraying later with reinforcement stitching, but also be used by finishing the edges of our patches later!
I tried to stitch at least a half inch out from the edge of the holes in my jeans, but I know my lines wandered. Lol. Just try your best and when in doubt, stitch further away rather than closer to the hole.
After you have your patch placed, you can decide how you want to clean up the hole to show it off! I tried a few different ways, but I liked the clean look of snipping away the majority of the strings. Always remember to be careful when cutting away the threads! I accidentally snipped my patch once and had to patch my patch… not my best moment. Hold the threads up and away from everything else to help make sure your scissors don’t cut something they aren’t supposed to.
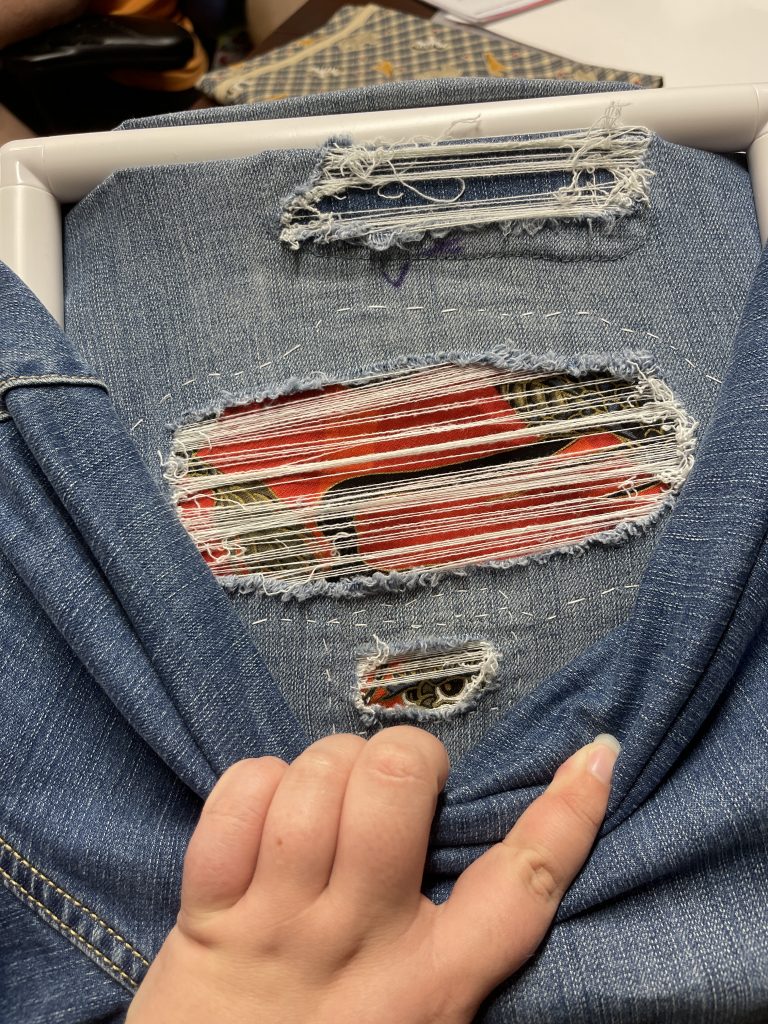


Once your patches are placed, you’ll want to finish their edges somehow. For most of my patches, I did a simple fold and whipstitch finishing. It helped make sure my patches won’t fray out or need to be replaced for quite a while!


On one of my patches, I tried out a very fun type of mending called sashiko. I used the persimmon blossom stitch pattern.


This made this particular patch very sturdy and made sure that it was almost woven together with the jeans. It will help make sure it doesn’t fray or wear out for a long time! I also love how it ended up looking… I think I’m going to add more sashiko to other patches in the future on these jeans!
Before and After Patches


Raising the Hem

Since I didn’t want them to be full length, I measured up from the floor to where I wanted them to end to be around capri length, then put on the jeans and marked the legs one inch longer than what I wanted them to be. Taking an inch off of the measurement gives wiggle room for hemming.
Then I took off the jeans and measured from the old hemline to where the new hem would be and put a few more marks across the leg. Then I drew a line connecting them and chopped off the extra length!
I repeated this process with both pairs on both legs.
Adding Flare and Flair
I also wanted to add some flare to my jeans. And yes I spelled it correctly… Because I love wide-leg bell-bottom jeans with swoosh!
While most tutorials say to split up the outside seam and add in some fabric, that wasn’t enough for me. I wanted more than that one little panel and adding a large panel to one spot left the leg looking kinda funny…


While laying flat it looked pretty cool. But it just didn’t flare the leg like I was wanting when standing.
I wanted the flare to be well spread out around the legs of the jeans. I measured across the top of the flare and the bottom and divided and marked it out so I’d have eight evenly placed gores.

Making the Gore Pattern
To make the gore pattern, you are going to need to measure from where you want the gore to start on the pant leg, down the hem of the pants. Take that measurement and add on enough for seams and hemming. I’d recommend two or three inches. I prefer to add more than I need and trim it off rather than not having enough and needing to cut out a new gore later.
That number with be to the length of your gore!
Since I wanted to have my gores make a half circle, I used a circle skirt calculator to figure out how to make them.


I wanted 8 gores that equaled up to half a circle. That meant I had 8 gores that needed seam allowance at their tops.
I’d say an inch, half an inch for each side is a good amount of seam allowance for this project. So that would be 8 inches of seam allowance needed for the top of the gores.
Take whatever amount of seam allowance you want and multiply that by how many gores you have to get how big your “waist measurement” is on the skirt calculator.
Here’s how I entered my numbers into the calculator,
Waist = How much room you need for seam allowance at the top of the gores.
For this example, let’s do 8.
Length = The length your gores need to be with room for seams and hemming.
That would be the length of your split + 2 or 3 inches (in my opinion)
For this example, let’s do 15.
This Should give you the Waist Radius – 1.76” for the example
And the Fabric Length – 17.55”
You will want to get a piece of paper that is at least the length of the fabric length measurement. I recommend a square piece as well.
Start in a corner of the paper and long straight lines, like the spokes on a wheel. Then start measuring out from the corner the Waist Radius amount the calculator gave you. In this example our waist radius is 1.76″, so we will mark that amount on each of the spokes. Connect those dots and we have the top curve of our pattern.
Measure down from the waist radius line your skirt length amount. Just like how we did with our waist radius. Then connect their measurement marks and we have our bottom curve!
If you started with a square corner, You will want to fold the pattern in half twice and then cut out only the one gore piece. You could start with the correct size paper, but I find it more difficult than just starting big and then folding the pattern till it’s the right size, then cutting along the fold line and the lines we drew out earlier.
I find explaining this process difficult. So, I made graphics! I hope they help make sure the process I used is accurately displayed. But if you find yourself having a hard time, feel free to reach out and I will try to help!


Next, you will need to cut out all of your gores. I used scraps of linen in rainbow colors.
After I cut them out, I put them through our overlock machine to finish the cut edges.
I loved the rainbow pile it left behind! lol

I’d recommend trying to overlock the denim cuts as well. The denim will fray if you don’t finish it!
I didn’t do that on this pair, so I ended up folding my seams over and zigzag stitching them down, sandwiching the cut denim between the denim of the pantleg and the overlocked linen. I really like how the zigzag ended up looking!
After that, I put the hem through the overlocker to even everything up and hemmed the pant legs!


The one thing I did learn that I have to warn others of, is that this will tighten the pant leg at the top of the gores. This was kind of a duh moment for me later, but I hadn’t realized it would take as much fabric as it did to do all of those seams.
With that in mind, I wouldn’t recommend doing this on pants or jeans that are already tight in the legs at the top of where the gores will start. Make sure you have extra room for the seams and finishing.


You can see that after a few washes and wears, the denim that’s on the outside of those zigzags has frayed out and become a bit of a mess. But the fabric in the seams is holding up great and I haven’t noticed any problems! However, I do think I will need to go through and cut away the mess of tangled blue thread sooner rather than later. lol